Extended ACL Configuration Commands Explained
An extended access list filters traffic at two levels: host-level and application-level. Host-level traffic includes all traffic originating from a specific host. Application-level traffic consists of all traffic originating from a specific application running on a particular host. For example, if three applications are running on a host, host-level traffic includes traffic from all three applications, while application-level traffic includes traffic from only a single application. This tutorial explains how to filter host-level traffic using an extended access list.
Setting up a practice lab
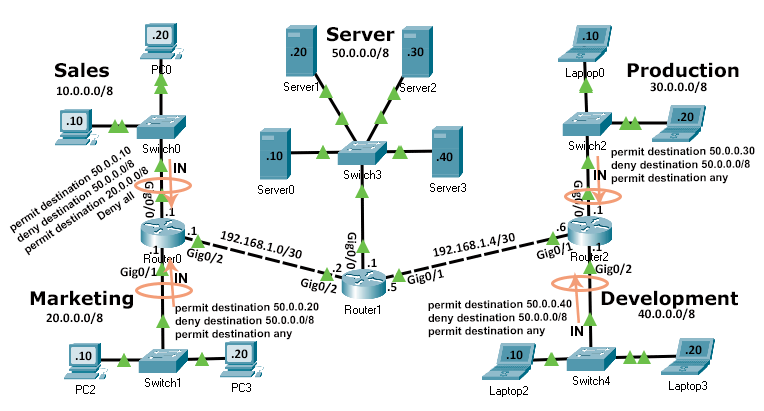
Create a packet tracer lab as shown in the following image.

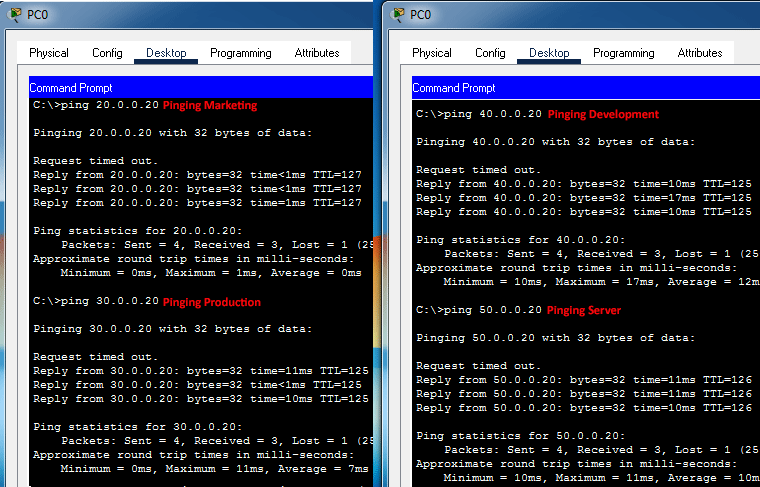
Configure IP addresses as shown in the above image, enable RIPv2 routing, and test connectivity between sections. If all sections can access each other, the lab is ready for practice. The following image shows the connectivity tests performed from PC0.
Pre-built practice lab
The following link provides this lab. It includes all the above configurations.
Packet Tracer Lab with Initial Configuration
Objectives:-
The Server section contains four servers: Server0, Server1, Server2, and Server3. These servers belong to the Sales, Marketing, Production, and Development sections, respectively. Currently, all sections can access all servers.
- Create an access list that allows a section to access only its server.
- Create an access list that allows the Sales section to access the Marketing section but denies access to the Production and Development sections.
Understanding requirements
The first requirement says every section must access its server only. It should not be able to access other sections' servers.
Since there are four sections, you need four access lists for this requirement. In each access list, create a statement that allows a packet only if the destination address matches the IP address of the allowed server.
After adding an allowed statement, create a deny statement that blocks a packet if its destination address field contains another server's IP address.
Access lists have a default deny statement at the end. This statement drops all unmatched traffic. Due to this default behavior, you must create a permit statement for all allowed traffic.
The second requirement says the Sales section should be allowed to access only the Marketing section. Access to the Development and Production sections should not be permitted.
To fulfill this requirement, you need two additional statements in the ACL to filter incoming traffic from the Sales section. You will create the first statement to allow a packet if the Marketing section's IP address is in the destination address field. You will create the second statement to deny a packet if its destination address field contains an IP address from other sections.
For the above requirements, you will create four extended ACLs. The following image shows the location, direction, and statements of these ACLs.
Creating extended ACLs
The access-list command adds an access list. It uses the following syntax for an extended access list.
Router(config)# access-list 100-199|2000-2699 permit|deny
IP_protocol
source_address source_wildcard_mask
[protocol_information]
destination_address destination_wildcard_mask
[protocol_information] [log]
This example needs four ACLs: two on Router0 and two on Router2.
Creating ACLs on Router0
Access the command prompt of Router0 and run the following commands.
Router>enable
Router#configure terminal
Enter configuration commands, one per line. End with CNTL/Z.
Router(config)#access-list 101 permit ip 10.0.0.0 0.255.255.255 host 50.0.0.10
Router(config)#access-list 101 deny ip 10.0.0.0 0.255.255.255 50.0.0.0 0.255.255.255
Router(config)#access-list 101 permit ip 10.0.0.0 0.255.255.255 20.0.0.0 0.255.255.255
Router(config)#access-list 101 deny ip 10.0.0.0 0.255.255.255 any
Router(config)#interface gigabitethernet 0/0
Router(config-if)#ip access-group 101 in
Router(config-if)#exit
Router(config)#access-list 102 permit ip 20.0.0.0 0.255.255.255 host 50.0.0.20
Router(config)#access-list 102 deny ip 20.0.0.0 0.255.255.255 50.0.0.0 0.255.255.255
Router(config)#access-list 102 permit ip 20.0.0.0 0.255.255.255 any
Router(config)#interface gigabitethernet 0/1
Router(config-if)#ip access-group 102 in
Router(config-if)#exit
Router(config)#exit
Router#
The above commands create two extended access lists: ACL 101 and ACL 102, and apply them to Gig0/0 and Gig0/1, respectively.
The ACL 101 contains four statements. The following table describes their meanings.
| Statement | Description |
| permit ip 10.0.0.0 0.255.255.255 host 50.0.0.10 | Allow a packet if its source address is from the network 10.0.0.0/8 and the destination address is 50.0.0.10. |
| deny ip 10.0.0.0 0.255.255.255 50.0.0.0 0.255.255.255 | Deny a packet if its source address is from the network 10.0.0.0/8 and the destination address is from the network 50.0.0.0/8. |
| permit ip 10.0.0.0 0.255.255.255 20.0.0.0 0.255.255.255 | Allow a packet if its source address is from the network 10.0.0.0/8 and the destination address is from the network 20.0.0.0/8. |
| deny ip 10.0.0.0 0.255.255.255 any | Deny a packet if its source address is from the network 10.0.0.0/8 and the destination address is from any network. |
For each packet, ACL checks statements from top to bottom in sequence until it finds a match. Once it finds a match, it does not check further statements for the packet.
The ACL 102 contains three statements. The following table lists their meanings.
| Statement | Description |
| permit ip 20.0.0.0 0.255.255.255 host 50.0.0.20 | Allow a packet if its source address is from the network 20.0.0/8 and the destination address is the host 50.0.0.20. |
| deny ip 20.0.0.0 0.255.255.255 50.0.0.0 0.255.255.255 | Deny a packet if its source address is from the network 20.0.0.0/8 and the destination address is from the network 50.0.0.0/8 |
| permit ip 20.0.0.0 0.255.255.255 any | Allow a packet if its source address is from the network 20.0.0.0/8 and the destination address is from any network. |
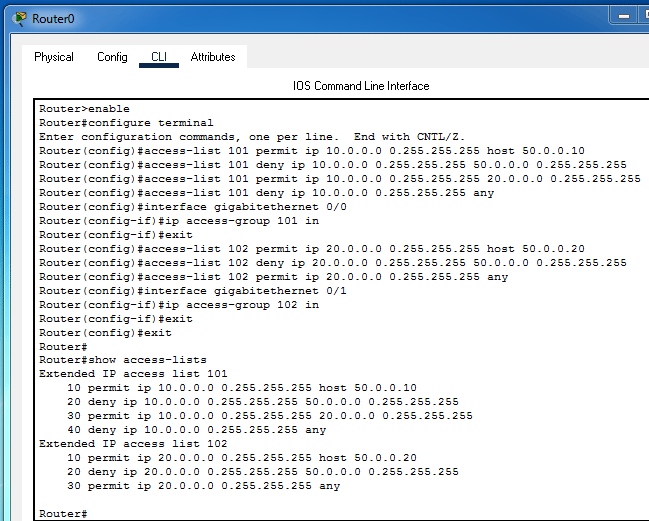
The following image shows how to create and verify extended access lists on Router0.
Creating ACLs on Router2
Access the command prompt of Router2 and run the following commands.
Router>enable
Router#configure terminal
Enter configuration commands, one per line. End with CNTL/Z.
Router(config)#access-list 101 permit ip 30.0.0.0 0.255.255.255 host 50.0.0.30
Router(config)#access-list 101 deny ip 30.0.0.0 0.255.255.255 50.0.0.0 0.255.255.255
Router(config)#access-list 101 permit ip 30.0.0.0 0.255.255.255 any
Router(config)#interface gigabitethernet 0/0
Router(config-if)#ip access-group 101 in
Router(config-if)#exit
Router(config)#access-list 102 permit ip 40.0.0.0 0.255.255.255 host 50.0.0.40
Router(config)#access-list 102 deny ip 40.0.0.0 0.255.255.255 50.0.0.0 0.255.255.255
Router(config)#access-list 102 permit ip 40.0.0.0 0.255.255.255 any
Router(config)#interface gigabitethernet 0/2
Router(config-if)#ip access-group 102 in
Router(config-if)#exit
Router(config)#exit
Router#
The above commands create two extended access lists: ACL 101 and ACL 102, and apply them to Gig0/0 and Gig0/2, respectively.
The ACL 101 contains three statements. The following table describes their meanings.
| Statement | Description |
| permit ip 30.0.0.0 0.255.255.255 host 50.0.0.30 | Allow a packet if its source address is from the network 30.0.0/8 and the destination address is the host 50.0.0.30. |
| deny ip 30.0.0.0 0.255.255.255 50.0.0.0 0.255.255.255 | Deny a packet if its source address is from the network 30.0.0.0/8 and the destination address is from the network 50.0.0.0/8 |
| permit ip 30.0.0.0 0.255.255.255 any | Allow a packet if its source address is from the network 30.0.0.0/8 and the destination address is from any network. |
The ACL 102 contains three statements. The following table lists these statements and their meanings.
| Statement | Description |
| permit ip 40.0.0.0 0.255.255.255 host 50.0.0.40 | Allow a packet if its source address is from the network 40.0.0/8 and the destination address is the host 50.0.0.40. |
| deny ip 40.0.0.0 0.255.255.255 50.0.0.0 0.255.255.255 | Deny a packet if its source address is from the network 40.0.0.0/8 and the destination address is from the network 50.0.0.0/8 |
| permit ip 40.0.0.0 0.255.255.255 any | Allow a packet if its source address is from the network 40.0.0.0/8 and the destination address is from any network. |
The following image shows how to create and verify extended access lists on Router2.

Verifying ACL implementation
To verify the ACL implementation, you can test connectivity between sections again. To test connectivity, use the ping command. The following image shows the testing from PC0 of the Sales section.
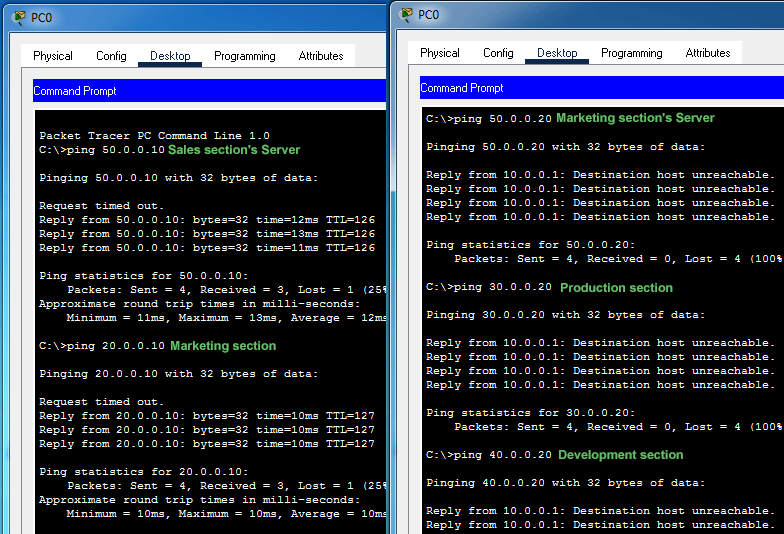
As the above image shows:-
- PC0 can access the Sales section's server, but it cannot access the Marketing section's server. It verifies that the ACL is allowing a device to access only its assigned server.
- PC0 can access the Marketing section, but not the Production or Development sections. It verifies that the ACL allows the Sales section to access the Marketing section, but it does not allow the Sales section to access the Production or Development sections.
The following image shows testing on Laptop0 of the Production section.
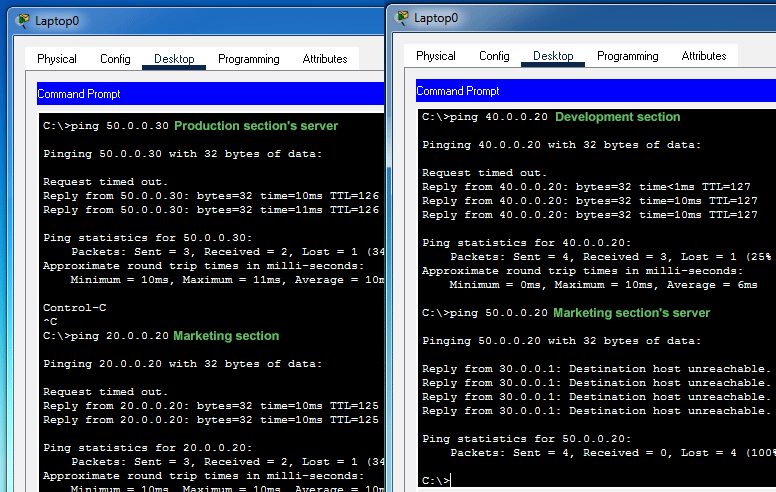
As the above image shows:-
The Laptop0 can access the Production section's server, but it cannot access the Marketing section's server. It verifies the following requirement.
Create an access list that allows a section to access only its server.
Laptop0 can access the Marketing and Development sections. It verifies that the ACL is not blocking any allowed traffic.
Configured Packet Tracer Lab
The following link provides the configured Packet Tracer lab for the above example.
Packet Tracer Lab with ACL Configuration
This tutorial is part of the tutorial "Cisco Access List Commands, Concepts, and Configurations". Other parts of this tutorial are as follows:
Chapter 01 Definition, purposes, benefits, and functions of ACL
Chapter 02 Basic concepts and fundamentals of ACLs
Chapter 03 How Access Lists work on Cisco routers
Chapter 04 Types of access control lists explained
Chapter 05 Wildcard Masks in ACLs Explained
Chapter 06 Rules and configuration guidelines for Cisco ACLs
Chapter 07 Access Control List Explained with Examples
Chapter 08 The ip access-list command options and arguments
Chapter 09 Standard ACL Configuration Commands Explained
Chapter 10 Configure Standard Access Control List Step-by-Step Guide
Chapter 11 How to secure VTY access to the Router
Chapter 12 Extended ACL Configuration Commands Explained
Chapter 13 Configure Extended Access Control List Step-by-Step Guide
Chapter 14 How to block ICMP Ping on Cisco Routers
Conclusion
Creating and implementing access lists is an essential skill for securing and managing network traffic. This tutorial explained how to create, implement, test, and verify extended ACLs using a Packet Tracer example. Practicing these configurations will enhance your networking skills and prepare you for real-world network management applications.
Author Laxmi Goswami Updated on 2025-11-08