How to configure IP address in Linux
An IP address is a computer's software address. Two computers can communicate if they have IP addresses. There are two ways to configure an IP address on Linux: temporary and permanent. A temporary IP address works only in the current login session. Linux stores it in the RAM and removes it when we log out from the current session. A permanent IP address works until a service or we manually update or change it. Linux stores it in a configuration file.
Setting a temporary IP address
We use the ip addr command to set a temporary IP address. This command adds the new IP address to the specified interface. It does not remove or update the existing IP address. It appends the current IP configuration.
Without any argument, it displays the IP configurations of all network devices.
ip addr
To view the IP configuration of a particular device, specify the interface's name as an argument after the show option. The following command displays the IP configuration of the ens160 interface.
ip addr show ens160
To use this command to add a temporary IP address, we need to use the 'add' and 'dev' options with the command.
ip addr add [ip_address/subnet_mask] dev [interface_name]
After the add option, specify the IP address with the subnet mask and the interface's name after the dev option.
The following command adds the IP address 192.168.1.10/24 to the ens160 interface.
ip addr add 192.168.1.10 255.255.255.0 dev ens160
You can recheck the device's IP configuration to verify the new IP address.
ip addr ens160
The following image shows the above exercise.

Setting a permanent IP address
There are four methods to configure a permanent IP address. These methods are: -
- Changing the configuration file
- Using the nmcli command
- Using the nmtui utility
- Using the nn-connection-editor tool
Let's discuss each method in detail.
Changing IP addresses in configuration files
Linux uses a configuration file for each interface to store its configuration. It stores all configuration files in the /etc/sysconfig/network-scripts directory. For the naming convention of interface configuration files, it uses the 'ifcfg' prefix. After this prefix, it uses the name of the network card. For example, if the interface's name is ens160, it will store its configuration in the ifcfg-ens160 file.
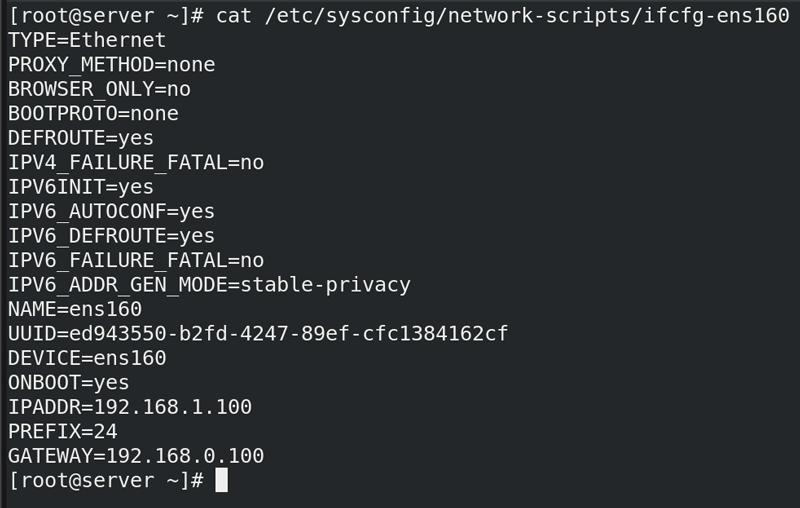
This file uses the IPADDR directive to configure a new IP address or change an existing IP address. You can edit or update this file using any text editor. The following image shows how to change the existing IP address by editing the configuration file.

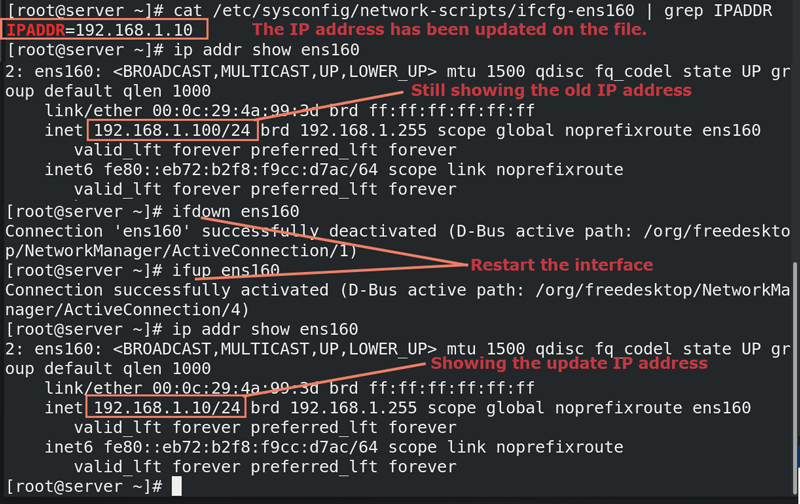
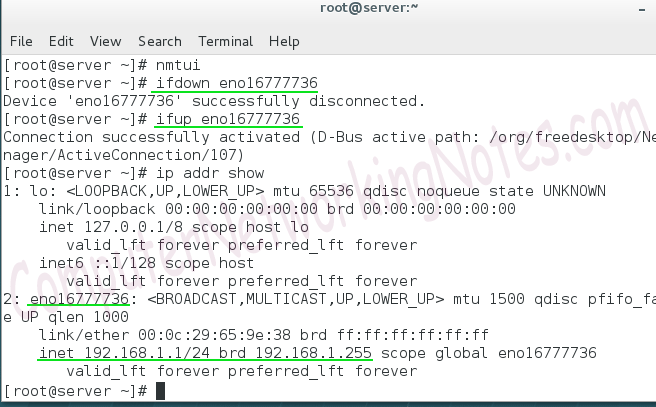
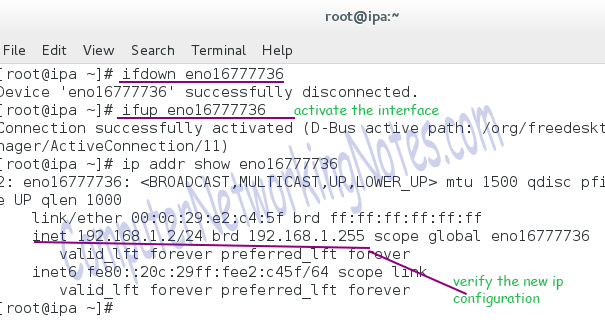
Linux reads this file only when the interface starts. It does not actively monitor this file. If you change this file, you must restart the interface to force Linux to reread the configuration file. You can use the ifdown and ifup commands to force Linux to reread this file. Specify the interface name as the argument with these commands.
#ifdown ens160
#ifdown ens160
The following image shows the above exercise.
Using the nmcli command to configure IP addresses
You can use NetworkManager's tools to avoid editing the configuration file directly. NetworkManager is the default network management service on Linux. It provides three tools for network configuration management: nmcli, nmtui, and nm-connection-editor.
NetworkManager uses the term 'connection' to refer to a network configuration file. It allows us to create multiple connections (configuration files) for the same interface. Multiple connections allow us to connect different networks without changing the IP configuration. For example, if you use your laptop at home and office, you can create two connections for your wireless interface: one for the home and another for the office. NetworkManager will automatically select the connection based on your location. If you use the laptop at home, it will use the home connection. It will use the office connection if you use it at the office.
Using the nmcli command to configure IP addresses
The following command lists all connections (configuration files) of the interface.
#nmcli con show [interface name]
The modify option modifies parameters of the connection. We can use this option to update the IP address. The following command sets the IP address to 192.168.1.100/24.
#nmcli con modify ens160 ipv4.address 192.168.1.100/24
After updating the IP address, use the following commands to restart the connection.
#nmcli con down ens160
#nmcli con up ens160
Now, recheck the IP address.
#ip addr show ens160
The following image shows the above exercise.

Using the nmtui utility to update IP addresses
The nmtui is a curses-based utility. It allows us to manage interfaces. The following command starts it.
#nmtui
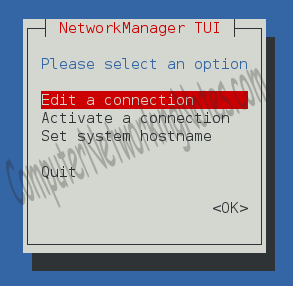
Select the "Edit a connection" option and press the Enter key.
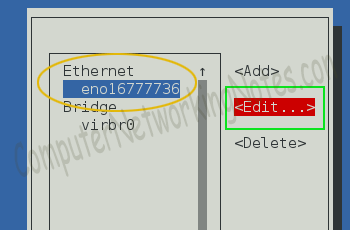
Select the NIC from the left pane, select the Edit option from the right pane, and press the Enter key.
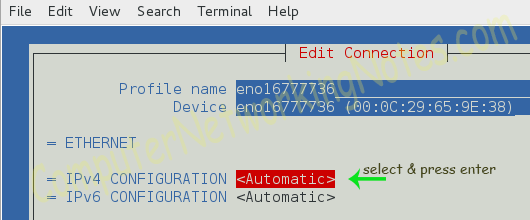
Select the Automatic option from the IPv4 configuration option and press the Enter key.
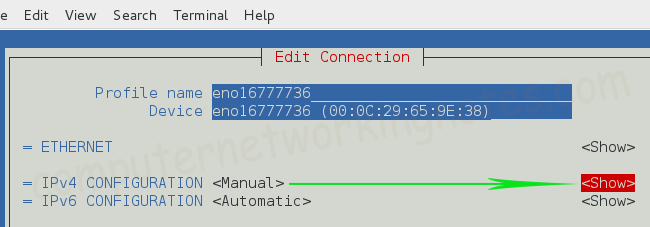
Select the Automatic option to obtain IP configuration from the DHCP Server. Use the Manual option to set the IP configuration manually.

Select the Show option and press the Enter key. Use the Tab key to switch between options.
Set the IP address/subnet mask, Gateway IP address, and DNS Server IP address.

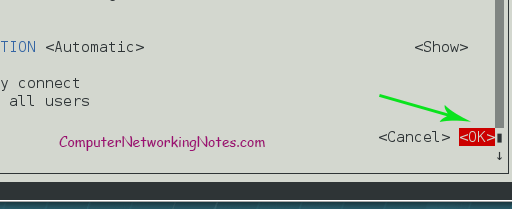
Select the OK option and press the Enter key to accept the change.
Select the Quit option and press the Enter key.
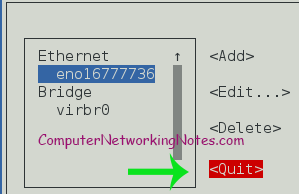
When we exit the nmtui utility, the changes and updates of the associated network configuration files are automatically applied. In the above example, since we assigned IP configuration to the eno16777736 interface, the nmtui utility updates the file /etc/sysconfig/network-scripts/ifcfg-eno16777736.
An interface restart is required to apply the new configuration. To restart the interface, use the ifdown-[NIC] and ifup-[NIC] commands.
Using the nm-connection-editor graphical utility
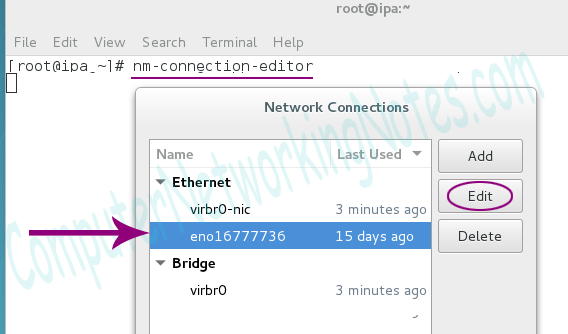
The nm-connection-editor is a desktop tool that works only on the desktop. To start it, open a terminal and run the following command.
#nm-connection-editor
From the opened window, select the appropriate NIC and click the Edit option
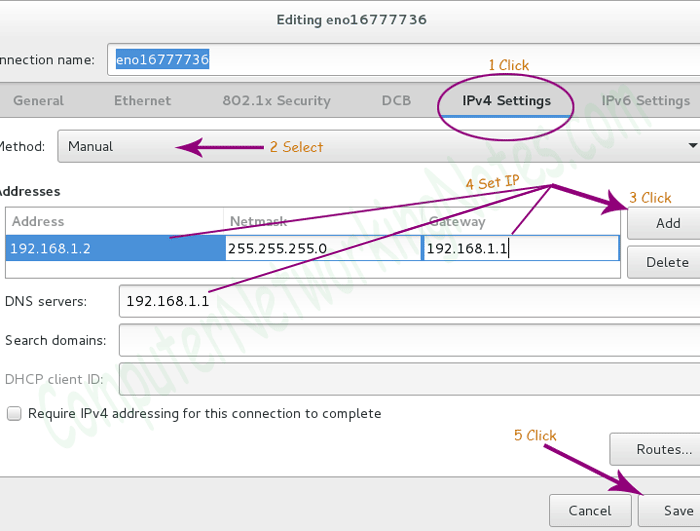
Use the following steps to add/update/edit IP configuration on the selected interface.
- Switch to the IPv4 Settings.
- Select the Manual option from the Method drop-down menu.
- Click the Add button and configure IP addresses in respective fields.
- Click the Save button.
- Click the Close button on the main screen.
Restart the interface and verify the new IP configuration.
This tutorial is part of the tutorial series Managing Basic Networking (RHCSA / RHCE) Study Guide. Other parts of this series are the following.
Chapter 01 Managing Basic Networking RHCSA Exam
Chapter 02 Predictable Consistent Network Device Naming
Chapter 03 Linux ip Address Command Usages and Examples
Chapter 04 Linux ip Command Cheat Sheet
Chapter 05 The ip Command v/s the ifconfig Command
Chapter 06 Understanding Linux Network Manager Fundamental
Chapter 07 Managing Linux NetworkManager
Chapter 08 Linux NetworkManager Tools and Utilities
Chapter 09 The nmcli Command on Linux Examples and Usages
Chapter 10 The nmtui Command and Utility on Linux
Chapter 11 The nm-connection-editor Command on Linux
Chapter 12 How to Configure IP Address in Linux
Chapter 13 How to Configure Multiple IP Addresses on Linux
Chapter 14 How to Configure IPv6 on Linux
Chapter 15 Basic Linux Commands for Network Testing
Chapter 16 Network Configuration Files in Linux Explained
Chapter 17 The /etc/hosts, /etc/resolv.conf, and /etc/nsswitch.conf Files
Chapter 18 How to Change the Hostname on Linux
Conclusion
All devices on a network need a unique IP address to communicate with other devices. On Linux, you can configure an IP address temporarily or permanently. A temporary IP address works only in the current session, while a permanent IP address works until you manually remove it.
Author Laxmi Goswami Updated on 2025-11-17