How to Configure a Postfix Null Client Step-by-Step
Postfix is an open-source Mail Transfer Agent (MTA). It is a secure, fast, and easy-to-manage alternative to Sendmail. It uses the SMTP protocol to exchange email messages between hosts. You can use it to set up a local mail server or create a null client. A Postfix null client only sends mail. It does not accept incoming mail or deliver any mail locally. It forwards all outgoing mail to a central mail server for final delivery. This tutorial explains how to configure, test, and verify a Postfix null client on RHEL/CentOS to forward all mail to a central mail server.
LAB Setup
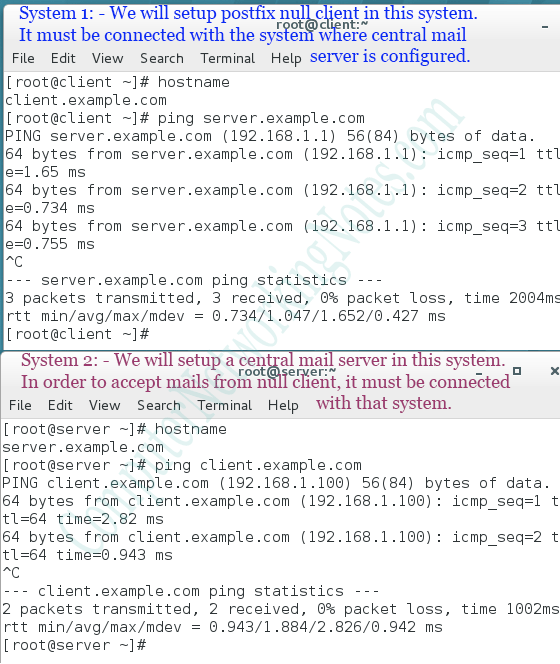
For the practice lab, you need at least two systems. On the first system, you will configure a null client that forwards all email to a central mail server. In the second system, you will configure a central mail server to accept mail from a null client. Both systems must be connected to each other and should be able to access each other via hostname.
The following tutorial explains how to set up this practice lab with virtual systems on VMware or VirtualBox.
Lab setup for practice
Postfix mail server
Starting from version 7.0, Postfix is the default mail server on RHEL/CentOS. Unless you manually uncheck the mail server option on the software selection screen during the installation process, the Postfix mail server should already be installed on your system. If not, use the following command to install it.
#yum -y install postfix
The main configuration file of the Postfix mail server is /etc/postfix/main.cf. This file stores all Postfix parameters. To configure the Postfix mail server, update the appropriate parameters in this file. The postconf command provides an easy way to edit this file. It allows you to perform the following actions directly from the command prompt without directly editing or opening the main configuration file.
- Query and display all settings or individual settings
- Modify and update an existing setting
- Add a new setting at the end of the file
To perform the above actions, use the following commands.
| Command | Description |
| postconf | Query and display all settings |
| postconf [parameter] [parameter] [parameter…] | Query and display an individual setting or multiple settings. Use white space to separate the parameters. |
| postconf –e '[parameter] [parameter value]' | If a parameter exists, update it; otherwise, add a new parameter at the end of the file. |
| postconf –n | Display the parameters that have been newly added or updated. |
Understanding essential Postfix settings
The main Postfix configuration file contains several settings. The postconf command without any options displays all settings.
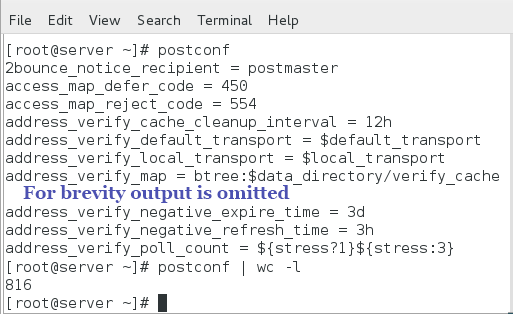
The following are essential settings for setting up a Postfix null client and a functional central mail server.
inet_interfaces
This setting defines the network interfaces on which Postfix listens for messages. If this setting is set to loopback-only, Postfix will listen only on the local system's loopback interface. If this setting is set to all, Postfix will listen from all systems on all network interfaces.
myorigin
This setting determines how the sender's address is displayed in the email. There are two ways to write it: with or without a hostname.
If a user Alex sends a mail from a system whose hostname and domain name are set to dev1 and computernetworkingnotes.com, respectively, the sender address will appear in the message as follows.
With hostname: - alex@dev1.computernetworkingnotes.com
Without hostname: - alex@computernetworkingnotes.com
Both addresses are correct and can be used in the sender address. Usually, the first type of address is used in a testing environment, while the second is used in the real world. In the real world, usually email recipients do not care from which system the message arrives. They only care about the user who sent the mail and the domain from which the mail arrived.
To use the sender address with the hostname, use the value $myhostname. To use the sender address without a hostname, use the value $mydomain.
relayhost
This setting specifies the location where Postfix sends all outgoing messages. If a central mail server is configured on the network, its name will be used in this setting on other network systems. On the central mail server, this setting defines the addresses of SMTP hosts on the Internet to which it should forward outgoing messages.
By default, Postfix performs a DNS MX record lookup for the value you specify in this setting. To instruct Postfix to avoid a DNS lookup for the specified hostname, put the hostname in square brackets. If the hostname is specified in square brackets, Postfix uses the hosts file rather than DNS to resolve the hostname. To disable DNS lookup completely, use the next setting.
disable_dns_lookups
If this setting is set to yes, Postfix will not perform DNS lookups to resolve hostnames. If this setting is enabled, you do not need to put the hostname in square brackets.
mydestination
This setting defines the domains from which Postfix accepts emails. Postfix accepts only incoming mail that is intended for the domains listed in this setting. If this setting is set to blank, Postfix will not accept any incoming mail.
local_transport
This setting specifies the local program Postfix uses to deliver received mail. If the host does not accept any incoming mail, set a descriptive error message, such as 'error: local delivery disabled', in this setting.
inet_protocols
This setting defines the version of the IP protocol that Postfix uses. By default, Postfix uses both versions (IPv4 and IPv6) for its operations. If your server does not use IPv6, set it to IPv4.
mynetworks
This setting defines the list of networks that are allowed to use this email server. This setting provides basic protection against email abuse. This setting limits Postfix to accept messages only from trusted networks.
The following table summarizes the settings required to configure a null client and a functional email server.
| Setting | Null Client | Functional Email Server |
| inet_interfaces | loopback-only | all |
| myorigin | $hostname | keep default /no change |
| relayhost | server.example.com | keep default / no change |
| mydestination | keep it blank | example.com, server.example.com |
| local_transport | error: local delivery disabled | keep default / no change |
| inet_protocols | ipv4 | ipv4 |
| mynetworks | 127.0.0.0/8 | keep default / no change |
| disable_dns_lookups | yes | yes |
In this example, the FQDN (Fully Qualified Domain Name) hostname of System1, where a central email will be set up, is server.example.com. If the hostname on your system is set to something other than server.example.com, use that name instead.
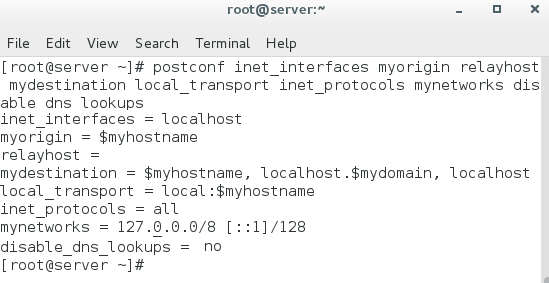
Change the above settings and verify the updated values with the following command.
#postconf inet_interfaces myorigin relayhost mydestination local_transport inet_protocols mynetworks disable_dns_lookups
Setting up a central mail server
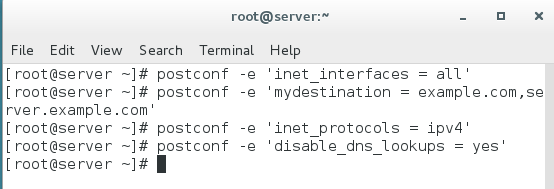
Log in from the root account on System 1 and run the following commands.
#postconf –e "inet_interfaces = all"
#postconf –e "mydestination = example.com, server.example.com"
#postconf –e "inet_protocols = ipv4"
#postconf –e "disable_dns_lookups = yes"
Postfix reads the configuration file when it starts. Any changes you make to the configuration file will not take effect until the Postfix service is restarted. Run the following commands to restart the Postfix service.
#postfix check
#systemctl restart postfix

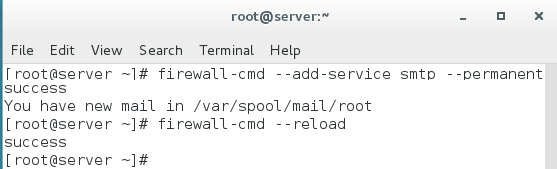
The default firewall configuration prevents Postfix from receiving incoming messages. Postfix uses the SMTP service to exchange messages with other email servers and hosts. To allow Postfix traffic, add an allow rule in the firewall for the SMTP service.
#firewall-cmd --add-service smtp --permanent
#firewall-cmd --reload
That’s all the settings you need to set up a functional Postfix email server that accepts emails from remote clients.
Postfix null client setup
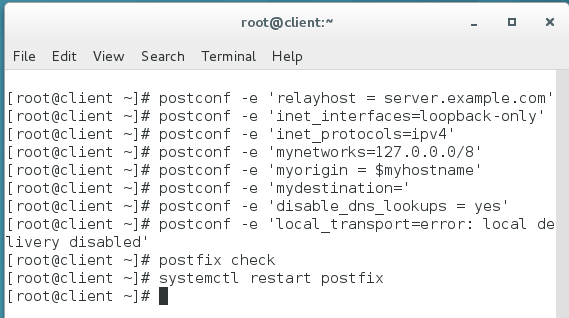
Access the root shell on System2 and run the following commands.
#postconf –e "relayhost = server.example.com"
#postconf –e "inet_interfaces=loopback-only"
#postconf –e "inet_protocols=ipv4"
#postconf –e "mynetworks=127.0.0.0/8"
#postconf –e "myorigin=$myhostname"
#postconf –e "mydestination="
#postconf –e "disable_dns_lookups=yes"
#postconf –e "local_transport=error: local delivery disabled"
The above commands configure Postfix as a null client. Run the following commands to check the configuration and restart the Postfix service.
#postconf check
#systemctl restart postfix
Testing and verifying Postfix null client setup
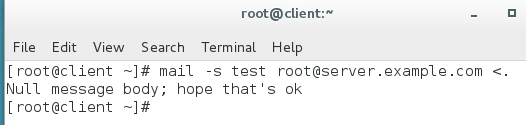
To test and verify the postfix null client setup, compose a simple mail with the subject line "test" and send it to the user root of System1. To compose and send an email directly from the command prompt, type the following on the command prompt and press Enter.
#mail –s test root@server.example.com <.
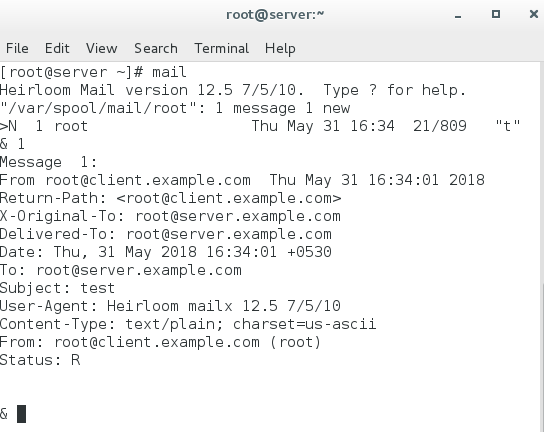
On System1, use the mail command to view the mails. You should see the test email sent from the null client.
Troubleshooting
Setting up a null client is simple and straightforward. Usually, there should be no issue with it. However, if your configuration is not working for some reason, the following tips will help you find and fix the problem.
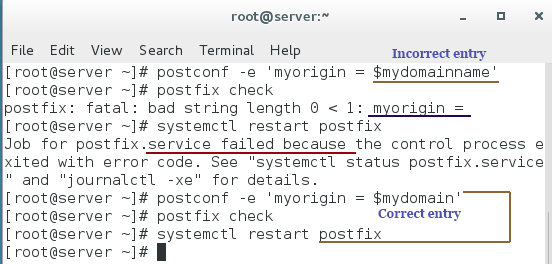
Incorrect setting in the configuration file
Adding an unrecognized setting or updating a setting incorrectly stops Postfix from starting. To confirm that all settings are configured correctly, use the postfix check command. This command checks all settings from the configuration file. If they are configured correctly, it returns nothing, but if any setting is configured incorrectly, it prints that setting to the terminal.
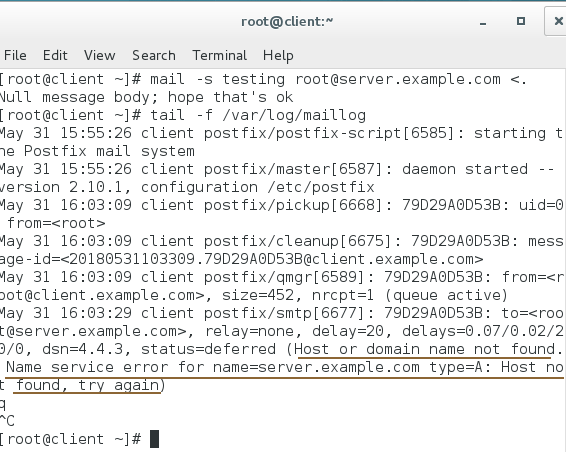
Log files
While debugging a service, log files are the most helpful resource. Postfix uses the /var/log/maillog file to store its logs. By examining this file, you can determine whether your message was delivered successfully. If not, you will often find an explanation for the failure. To examine this file, use the following command.
#tail –f /var/log/maillog
The postqueue command
Finally, use the postqueue command to view and flush messages still waiting for delivery. To view the delivery queue, use the postqueue –p command. To flush the delivery queue, use the postqueue –f command.
Conclusion
This tutorial explained how to configure a Postfix null client on RHEL/CentOS systems to forward all mail to a central mail server. This setup streamlines email management by centralizing delivery and helps maintain a secure and organized mail infrastructure. If you encounter any issues, refer to the troubleshooting steps provided, and use system logs to diagnose problems efficiently. With these skills, you can manage email forwarding in enterprise environments more effectively.
Author Laxmi Goswami Updated on 2026-05-16