How to Configure and use Linux as a Router
On an IP network, two computers can communicate only if they belong to the same IP subnet. If two computers belong to different IP subnets, they need a router to connect. A router connects different IP subnets. It receives data packets from a source on an IP subnet and sends them to a destination on another IP subnet. This process is called IP forwarding. In addition to IP forwarding, a router provides many other features, such as packet filtering, voice over IP, IP firewalls, and NAT. Apart from IP forwarding, if your setup needs any other feature or function of the router, you must buy and use a router. However, if it needs only IP forwarding, you can use a Linux system for it.
Advantages of using a Linux system for IP forwarding
Choosing a Linux system for IP forwarding over a router provides two main advantages. The first benefit is that it is cheaper. A router is an expensive device. Adding it to the network for IP forwarding increases network cost. On the other hand, using a Linux system for IP forwarding is much cheaper. If you already have a Linux system in your network, you can use it for IP forwarding. If not, you can install Linux on any unused or spare system and add it to the network. The second advantage is that it is straightforward. Unless you are a network administrator or have routing knowledge, enabling IP forwarding on a router is a complex task. On the other hand, enabling it on a Linux system is as simple as running a command on the terminal.
Setup
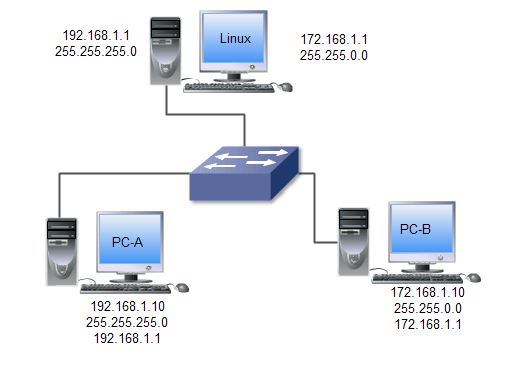
You need at least three systems to set up a practice lab. Among these systems, one system must be a Linux system. Remaining systems can use any operating system. Apart from assigning an IP address, you do not need to make any changes to these systems. For convenience, let's use the names Linux, PC-A, and PC-B for these systems. PC-A and PC-B will represent different IP subnets. Linux will provide connectivity between these systems.
Assign the following IP configurations to PC-A and PC-B.
| PC-A | PC-B | |
| IP address | 192.168.1.10 | 172.168.1.10 |
| Subnet mask | 255.255.255.0 | 255.255.0.0 |
| Gateway | 192.168.1.1 | 172.168.1.1 |
If your setup requires or uses different IP configurations, make sure you assign the IP address you configure on the Linux system as the gateway IP address on its connected subnet.
Updating the IP configuration on the Linux system
Since the Linux system will act as a gateway or router, you must configure one IP address per subnet. This IP address will work as the gateway IP address for that subnet. For example, if your network has five subnets, you have to configure five IP addresses: one in each subnet. You do not need five NICs on the Linux system for five IP addresses. You can assign all five IP addresses to a single NIC. Linux allows you to configure and use multiple IP addresses on the same NIC. This example has two IP subnets. It requires two IP addresses on the Linux system, one from each IP subnet.
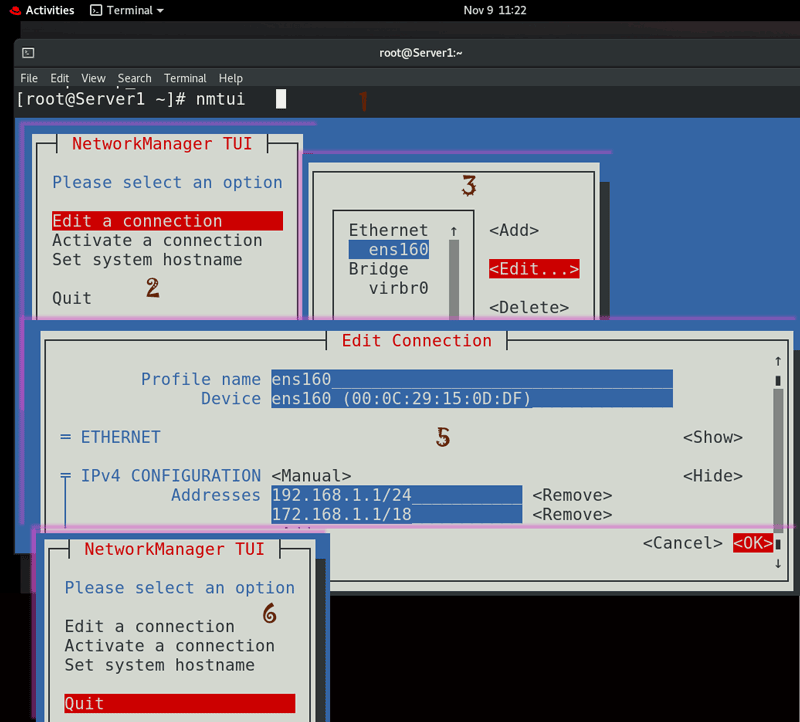
Linux provides many tools for IP configuration and management. You can use any utility to update the IP configuration. This tutorial uses the nmtui tool.
- Start the nmtui utility.
- Select Edit a connection on the main screen.
- Select the interface in the left pane and use the Edit option to open its configuration.
- Select the Manual method in the IPv4 configuration section.
- Assign two IP addresses 192.168.1.1/24 and 172.168.1.1/18. To assign the second IP address, use the Add button.
- Save the configuration and quit the nmtui utility.
The following image shows the above process.
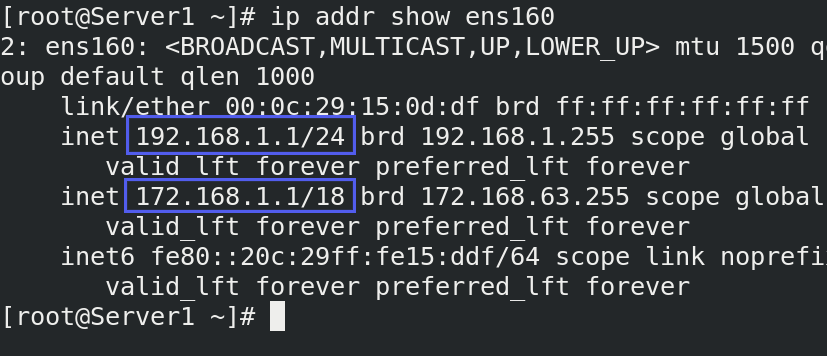
To check and verify the new IP configuration, use the 'ip addr show [interface]' command.
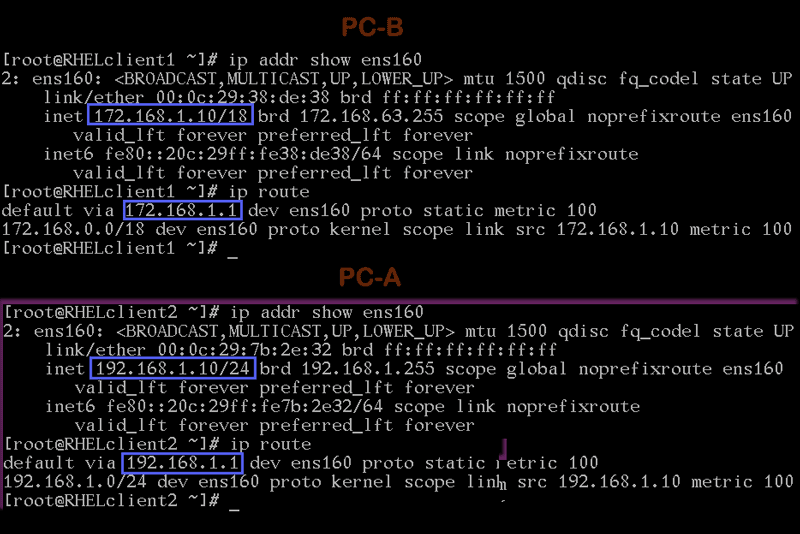
Use the same process, and configure IP addresses on both systems that you want to use for testing. On these systems, you also need to add the gateway IP address. Add the Gateway IP address from the same subnet.
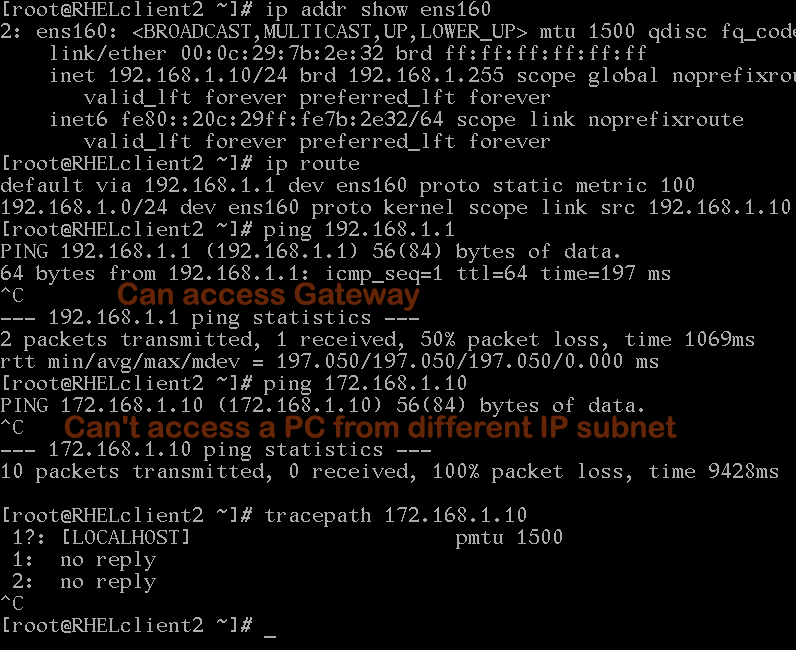
- On PC-A, assign an IP address (192.168.1.10/24) from the network 192.168.1.0/24 and configure the gateway to 192.168.1.1.
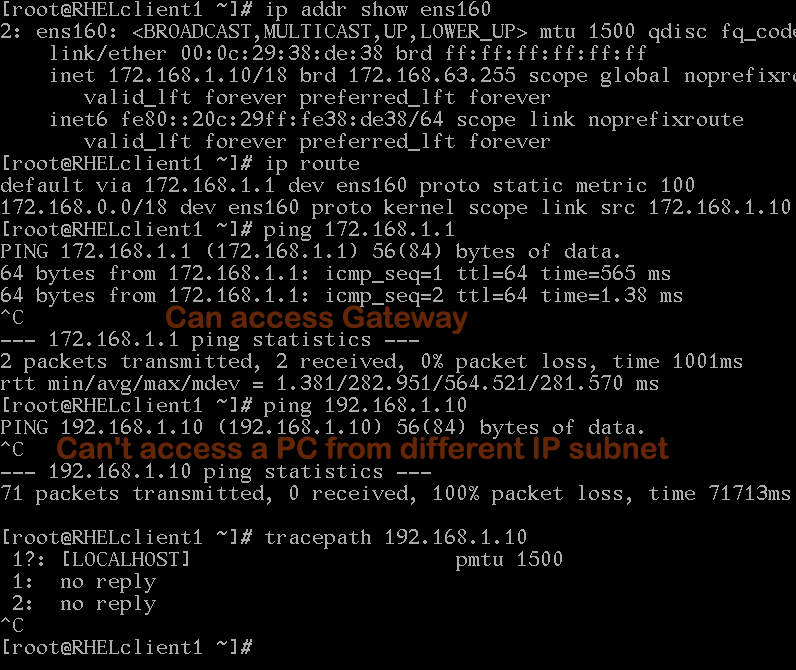
- On PC-B, assign an IP address (172.168.1.10/18) from the network 172.168.1.0/18 and configure the gateway to 172.168.1.1.

Check the IP configuration on both systems to verify the new IP configuration and gateway IP address.
Testing the LAB setup
To test this lab setup, perform the following steps.
Send ping requests from PC-A (192.168.1.10) to the gateway IP (192.168.1.1/24) configured on the Linux system. It should get replies from the gateway IP. After it, send ping requests to PC-B (172.168.1.10/18). Since PC-B is on a different IP subnet and IP forwarding has not yet been configured, it should not receive a reply. You can also use the tracepath command to view the path packets take to reach PC-B.
Perform the same testing on PC-B.
Enabling IP forwarding
You can enable or disable IP forwarding temporarily and permanently. If you enable it temporarily, it will work until you restart the system. If you enable it permanently, it will work until you manually disable it.
Enabling/disabling Temporarily
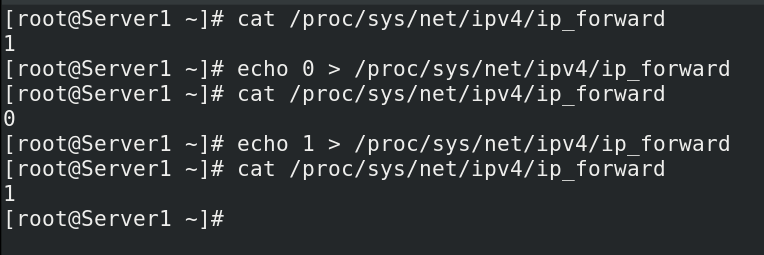
Linux keeps all running processes in the /proc directory. The /proc directory represents the kernel's current state. It allows applications and users to view currently running processes and update their settings on the live system. Linux controls IP forwarding via the /proc/sys/net/ipv4/ip_forward file. There are two ways to change the value of this process. You can use the echo command to update this value directly or use the sysctl command.
Using the echo command
The following command displays the current state of the IP forwarding.
#cat /proc/sys/net/ipv4/ip_forward
It uses two configuration values, 0 and 1. It uses 0 to disable and 1 to enable IP forwarding. The following command enables IP forwarding in the current session.
#echo 1 > /proc/sys/net/ipv4/ip_forward
The following command disables it in the current session.
#echo 0 > /proc/sys/net/ipv4/ip_forward
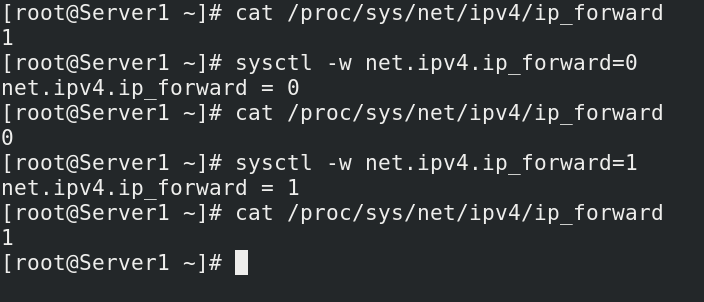
Using the sysctl command
The following command enables IP forwarding.
#sysctl -w net.ipv4.ip_forward=1
The following command disables it.
#sysctl -w net.ipv4.ip_forward=0
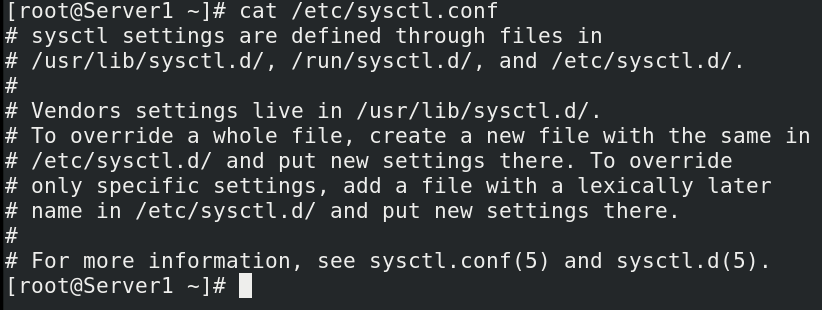
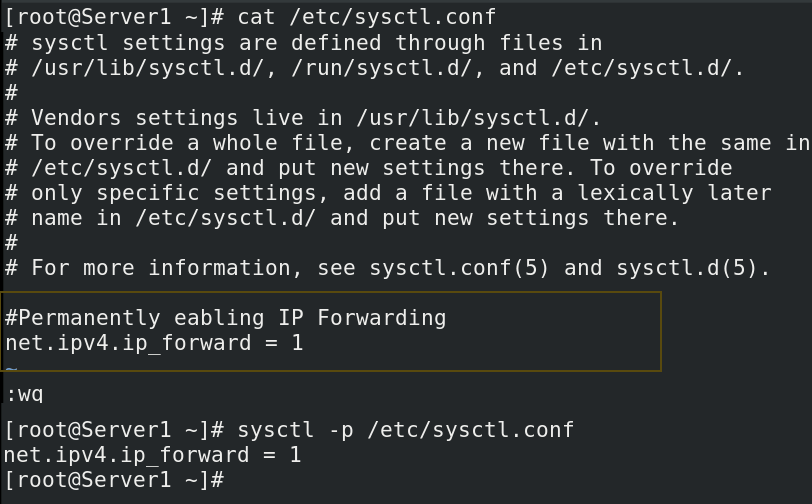
Permanently enabling/disabling
Linux saves the boot-time state for IP forwarding in the /etc/sysctl.conf file. It is the default file. You can edit it or create a custom file in the /etc/sysctl.d/ directory. A system update can overwrite default files. Whether you use a custom or default file, the entry is the same.
Open the /etc/sysctl.conf or create a custom file in the /etc/sysctl.d/ directory.
#vim /etc/sysctl.conf
or
#vim /etc/sysctl.d/sysctl.conf
Add the following configuration directive.
#Permanently enabling IP forwarding
net.ipv4.ip_forward = 1
To permanently disable IP forwarding, add the following line.
#Permanently disabling IP forwarding
net.ipv4.ip_forward = 0
Testing IP forwarding
Send ping requests from PC-A to PC-B again.
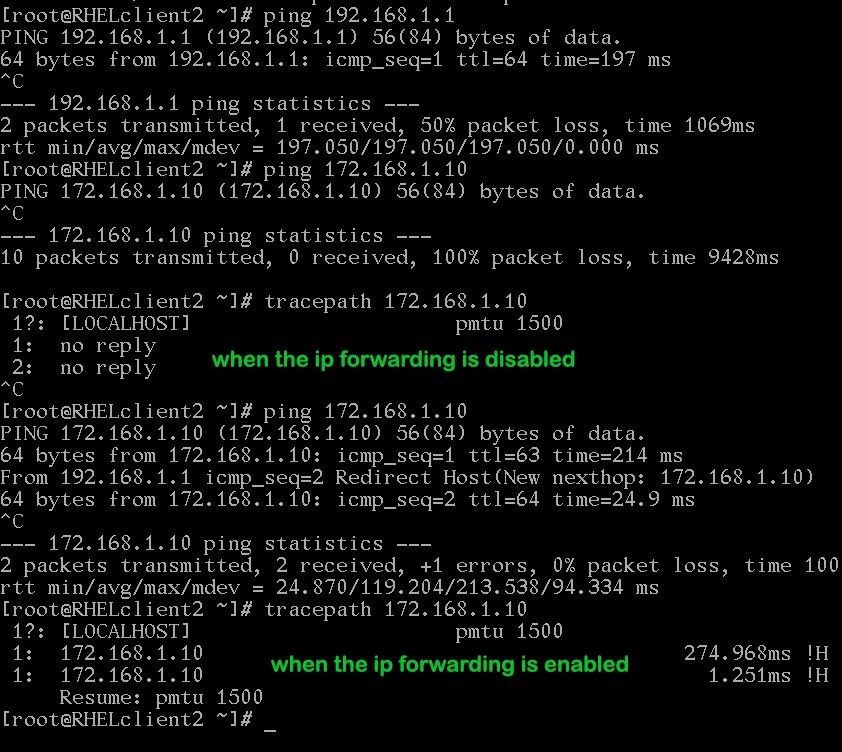
Repeat the same testing on the PC-B.
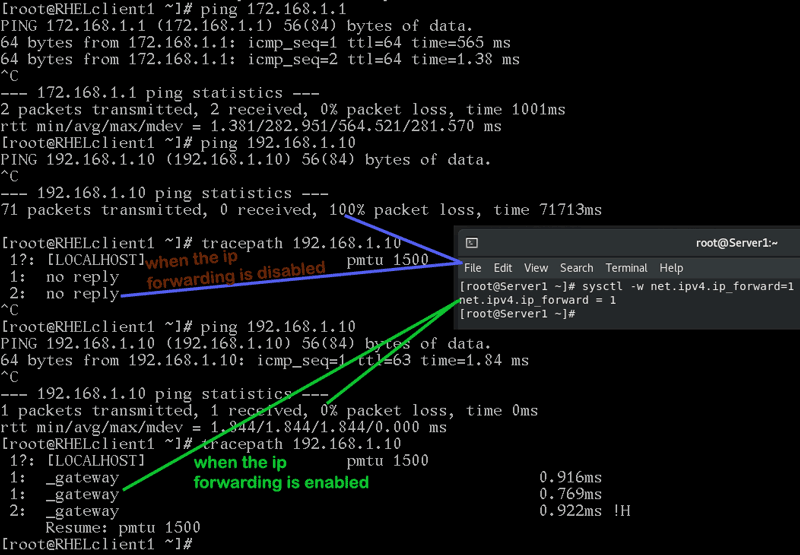
If both PCs get replies, it verifies IP forwarding configured on the Linux system and connectivity between different segments configured on both systems.
Conclusion
Using a Linux system as a router provides a cost-effective routing solution. In addition, it is also easy to manage. This tutorial explains the steps you need for this through an example. Learning these steps helps you use a Linux system as a router.
Author Laxmi Goswami Updated on 2026-05-16