How to Configure Local Repository in RHEL Linux
RHEL Linux uses online repositories to store and manage software packages. When you install RHEL Linux, the installation process automatically configures the settings the local system requires to connect and download packages from these repositories. However, you need an active subscription to use these repositories. RedHat subscription is not free. You need to pay a subscription fee. If you want to use an RHEL system in the production environment, you should purchase it. A subscription lets you download the packages and get technical support from Red Hat.
RedHat releases RHEL Linux under the GPL license. It means you can download and use it without purchasing a subscription. However, you will not get updates and support from Red Hat until you have an active subscription. That is perfectly fine if you want to use RHEL for testing and learning in the LAB environment. While learning and testing, you need to install several packages and dependencies. If you do not have an RHEL subscription, you cannot use the default online repositories to download and install packages. However, you can create and use a local repository to install packages and dependencies.
Creating a local repository
To create a local repository, you can use the same installation disk you used to install the Linux. If you have an RHEL ISO image file, you can also use it to create the local repository. If you use Linux on a virtual machine, you can use the RHEL ISO image directly from the host system. Regardless of your setup, the process for creating and using a local repository is the same.
Step 1 (Getting the source image file)
First, you need the RHEL installation disk or image file. If you have it, move to the second step. If not, you can download it from Redhat's official website.
https://www.redhat.com/en
You need a free Red Hat account to download resources. Create a free account and download the latest version of RHEL.
Step 2 (Accessing the installation files)
Accessing the installation files depends on whether you have the installation disk or the IOS image file. An IOS image file contains installation files in an archive format. You can access installation files only after mounting the IOS image file to a mount point. Create a mount point and mount the IOS image file.
#mkdir /[mount_point_name]
#mount -o loop [ios-image-file-path] /[mount_point_name]
The following command creates the mount point image-file on the / directory.
#mkdir /image-file
The following command mounts the rhel-baseos-9.4-x86_64-dvd.iso iso image file from the current directory to the /image-file mount point.
#mount -o loop rhel-baseos-9.4-x86_64-dvd.iso /image-file
After mounting the IOS image file, you can access its files from the mount point.
#cd /image-file
#ls
The installation disk contains files. If you have the installation disk, you can access installation files directly. Insert the installation disk into the DVD drive and access its contents from the /run/media/[username]/ directory.
#ls /run/media/[username]/

If you have the RHEL installation on a virtual system and the IOS image on the host system, attach the IOS image to the virtual system's DVD drive. The virtual system mounts the IOS image as the regular disk. You can access its contents as the regular installation disk.
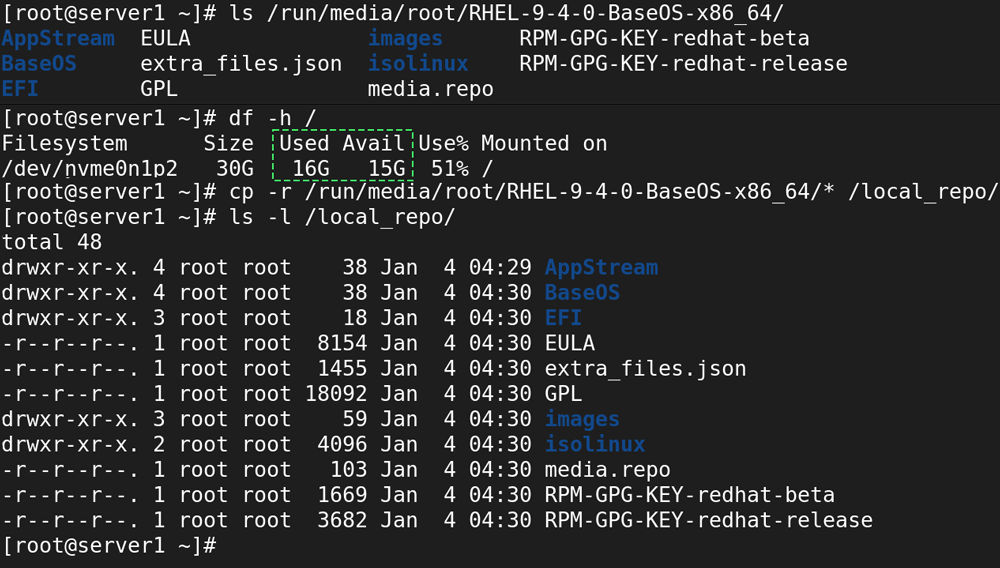
Step 3 (Copying all disk contents)
RHEL installation disk contains 10 to 12 GB of data. Select a partition with enough space to save all files and directories from the installation disk. You can use the df -h command to view a partition's consumed and free space. After selecting the partition, make a directory and copy all contents from the installation disk.
#df -h /
#mkdir /local_repo
#cp -r /run/media/root/RHEL-[version]-BaseOS-x86_64/* /local_repo/
#ls -l  /local_repo
Step 4 (Creating repository configuration file)
The repository configuration file specifies the location and other necessary settings software management tools need to connect to the repository and download packages. The following table lists the required settings for a repository configuration file.
| [repositoryid] | It is the ID of the repository. It must be unique for each repository. |
| name | It is the name of the repository. |
| metadata_expire | It is the time in seconds after which the metadata will expire. If you set its value to -1, the metadata will never expire. |
| enabled | It is a setting that controls the use of this repository. If you set its value to 0, Linux will not use it. If you set its value to 1, Linux will use it. |
| gpgcheck | It is a setting that controls the GPG signature check on packages downloaded from this repository. To turn it off, use the value 0. To enable it, use the value 1. |
| baseurl | It is a URL to the directory where the packages reside. |
| gpgkey | It is a URL or a file location containing an ASCII GPG key. If you enable gpgcheck, you must configure the path or location in this setting. |
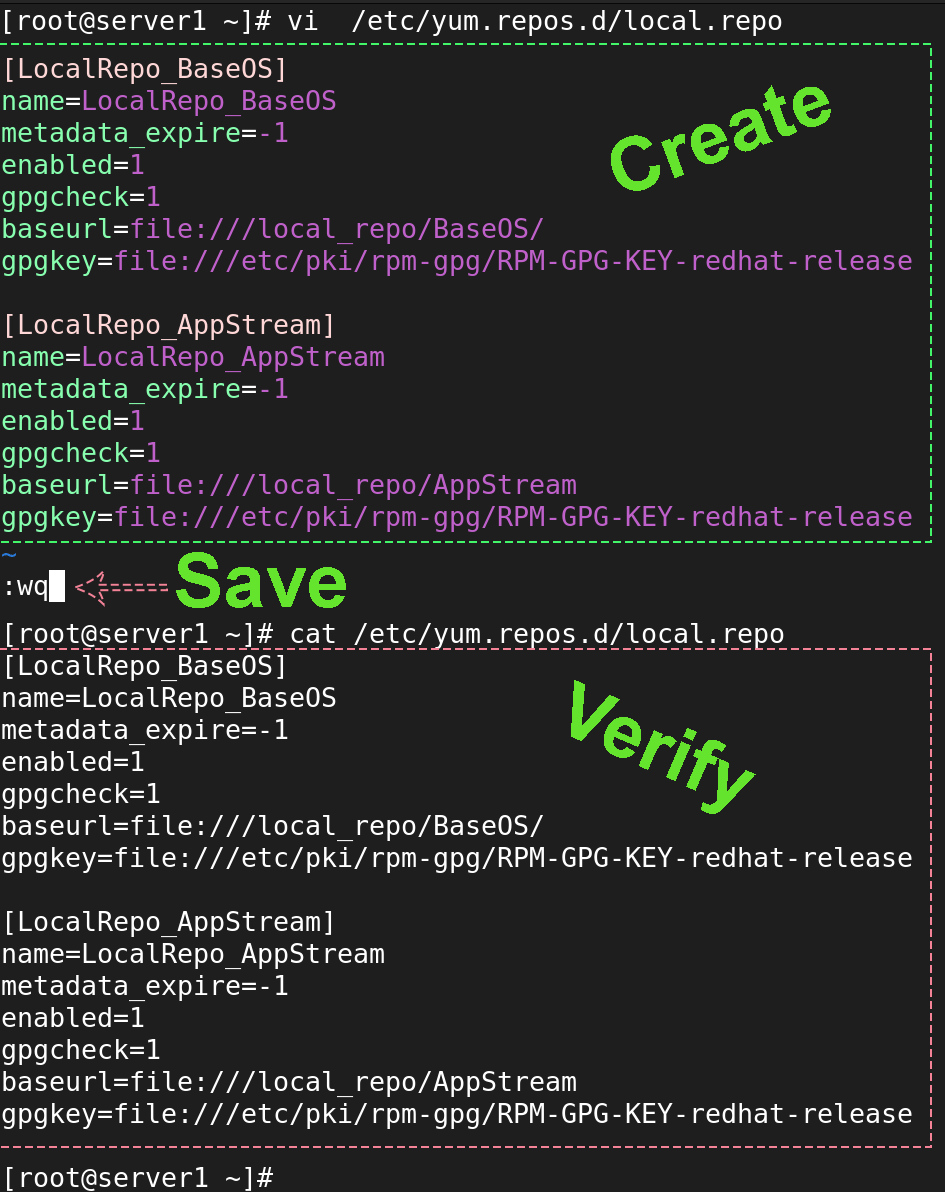
The /etc/yum.repos.d/ directory saves repository configuration files. Create a text file in this directory with the following configuration values.
[LocalRepo_BaseOS]
name=LocalRepo_BaseOS
metadata_expire=-1
enabled=1
gpgcheck=1
baseurl=file:///local_repo/BaseOS
gpgkey=file:///etc/pki/rpm-gpg/RPM-GPG-KEY-redhat-release

[LocalRepo_AppStream]
name=LocalRepo_BaseOS
metadata_expire=-1
enabled=1
gpgcheck=1
baseurl=file:///local_repo/AppStream
gpgkey=file:///etc/pki/rpm-gpg/RPM-GPG-KEY-redhat-release
Use the cat command to verify the configuration.
Step 05 (Updating repository list)
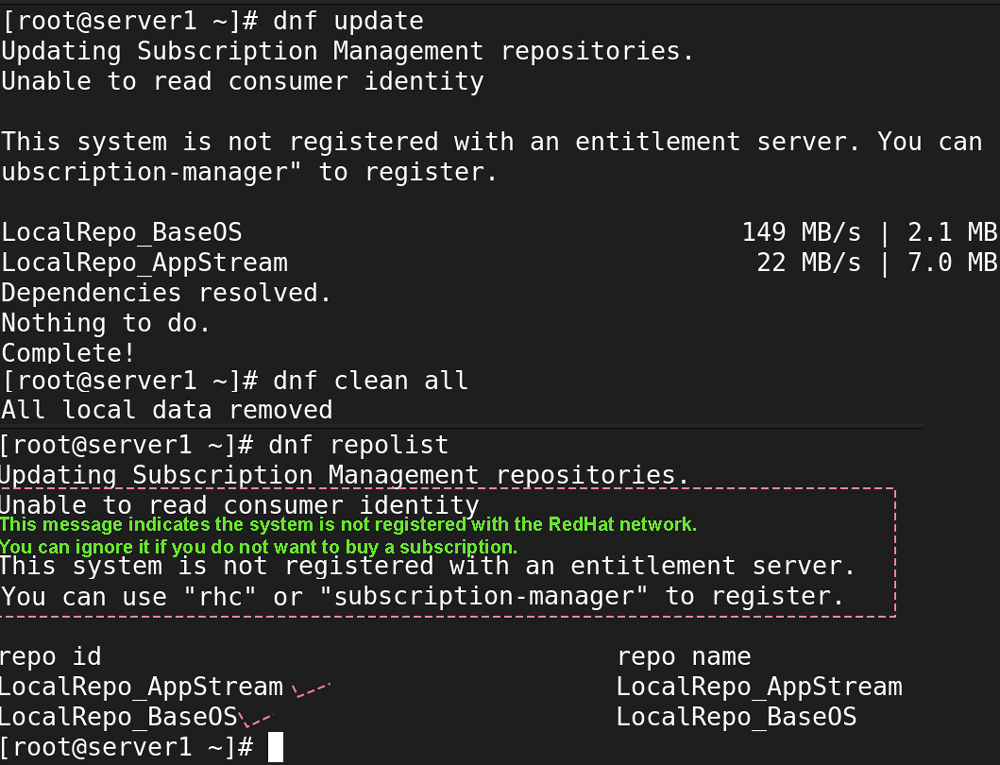
The following command updates repository lists.
#dnf update
Step 06 (Cleaning repository cache)
The following command cleans all repository cache.
#dnf clean all
Step 07 (Listing repositories)
The following command lists all configured and enabled repositories.
#dnf repolist
If the system is not registered to the Red Hat network, the output of the above command includes an indicative message. You can ignore it.
Verifying the local repository
You can verify the local repository by installing a package. The following command installs the vsftpd package.
#dnf install vsftpd
DNF is the default package management tool on RHEL. You can use it to list repositories, install and manage packages, turn repositories on and off, and perform many other tasks related to package management. The following tutorial explains how to use it.
DNF Command on Linux Examples and Usages
Conclusion
Configuring a local repository is essential when a Red Hat subscription is unavailable. You can create a self-sufficient local repository to install necessary packages and dependencies without relying on external repositories. This tutorial provided a step-by-step approach to setting up a local repository using the installation disk or an ISO image file.
Author Laxmi Goswami Updated on 2026-05-19