How to install and use 7zip in Ubuntu Linux
7zip is a community-based open-source file archiver. You can use it to create a file archive, add files to an existing archive, list archive files, delete a file or files from an archive, and extract an archive.
Supported format
7zip supports the following formats.
| Compressing and Decompressing | Decompressing only |
| 7z, XZ, BZIP2, GZIP, TAR, ZIP and WIM | AR, ARJ, CAB, CHM, CPIO, CramFS, DMG, EXT, FAT, GPT, HFS, IHEX, ISO, LZH, LZMA, MBR, MSI, NSIS, NTFS, QCOW2, RAR, RPM, SquashFS, UDF, UEFI, VDI, VHD, VMDK, WIM, XAR and Z |
7zip and p7zip
The official website offers 7zip only for the Windows platform. It does not provide a Linux version of 7zip. However, it releases 7zip under the GPL license. A GPL license allows you to view and change the source code. It also allows you to redistribute the modified software under the same license. Since 7zip is available under the GPL license, some developers made a Linux version of 7zip from the source code.
The Linux version of 7zip is known as p7zip. Since 7zip and p7zip use the same source code, both provide the same features and functions. The only difference between both is that you will not get support for p7zip from the official site. However, you can use the Ubuntu support forum to get help and support for p7zip.
Installing p7zip
The following commands install p7zip.
$sudo apt-get update
$sudo apt-get install p7zip-full

The first command is optional. It updates the repository data. Updating repository data ensures you get the latest version of the software.
The second command installs the latest version of p7zip.
Verifying 7zip installation
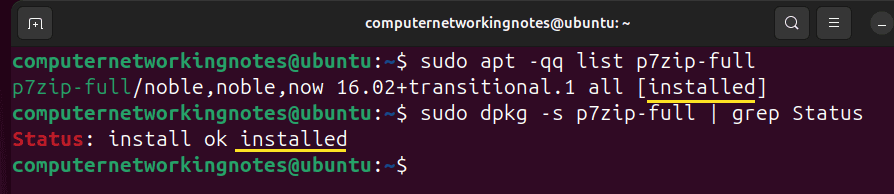
The following commands verify the p7zip installation.
$sudo apt -qq list p7zip-full
$sudo dpkg -s p7zip-full | grep Status
7zip syntax
7zip uses the following syntax.
$7z [command option] [archive file name] [files]
The following table lists the most common and frequently used options.
| Option | Action | Description |
| a | Add | Add files to the archive |
| l | List | List the contents of the archive |
| u | Update | Update the files in the archive |
| e | Extract | Extract files from the archive without their full path |
| x | Extract | Extract files from the archive with their full path |
| d | Delete | Delete files from the archive |
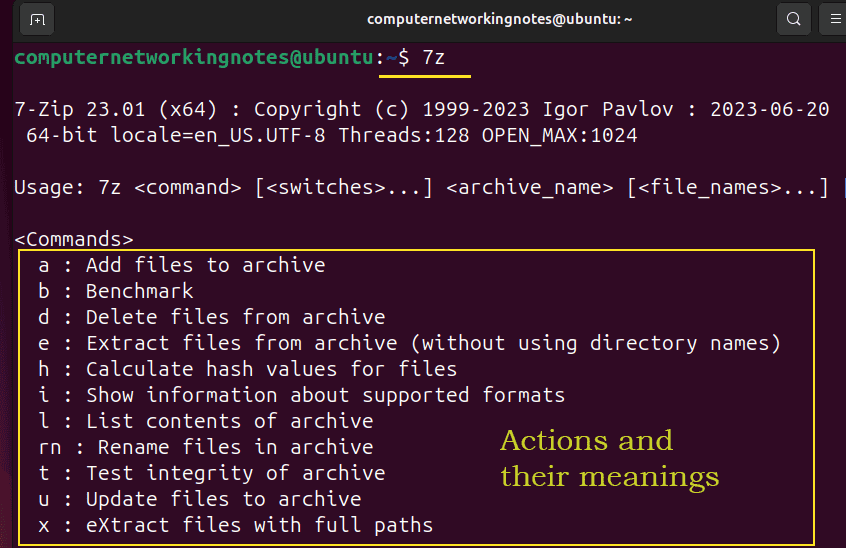
You do not need to memorize any option from the above table. Without any option or argument, the $7z command lists all options and their meanings.
$7z
The $7z command examples
The $7z command creates and manages file archives. To understand these actions, we need some text files. Hence, before we take the $7z command examples, let us create some text files.
- Create a directory.
- Create a few text files in this directory. You can use manual pages of commands to create text files.
- Enter the directory and list the size of all files
- Exit the directory and print the directory size
$mkdir testdir
$cd testdir
$man ls > tf1
$man mkdir > tf2
$man cat > tf3
$man nano > tf4
$man grep > tf5
$ls
$du -h *
$cd ..
$du -h testdir

Compressing files
The following command compresses the file.
$7z a [compressed file name & format] [file name]
In compressed format, a file consumes less disk space than the regular format. You can verify this by comparing a file's size in both formats. Previously, we created a text file named tf5. Compress it. List its size before and after the compression.
$du -h tf5
$7z a myarchive.7z tf5
$du -h myarchive.7z

Creating archives
The following command creates an archive.
$7z a [archive file name] [file name 1] [file name 2] [file name 3] [file name …]
An archive is a collection of files and directories. It allows you to move a large amount of data from one place to another as a single file. For example, you want to copy hundreds of files from one system to another. In the default operation, you have to transfer all the files separately. It takes a lot of time and effort. An archive makes this operation simple.
Create an archive of all files on the first system, move it to the target system, and extract it.
The following command creates an archive named multifiles.7z and adds three files named tf3, tf4, and tf5.
$7z a multifiles.7z tf3 tf4 tf5

The following command creates an archive named allfileofdir.7z and adds all files of the testdir directory.
$7z a allfileofdir.7z testdir

Listing archive files
The following command lists the contents of the archive.
$7z l [archive file name]
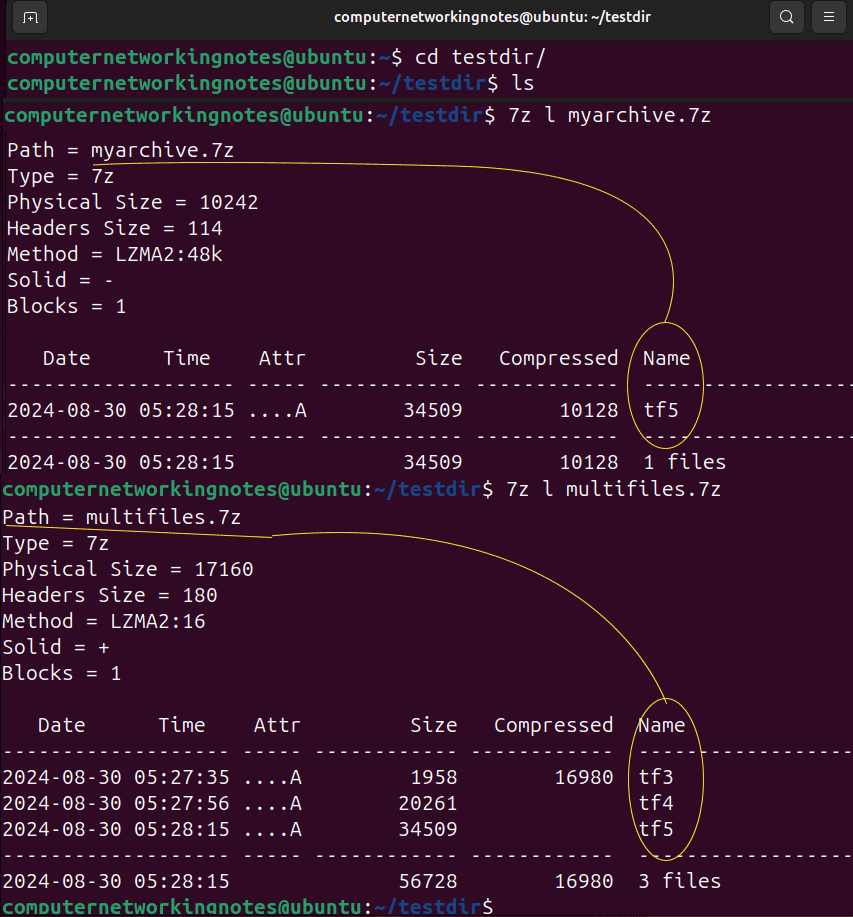
The above command displays all information about the archive and its contents. The information includes the archive file path, size, header, blocks, and method. The following commands list the archives we made in the previous example.
$7z l myarchive.7z
$7z l multifiles.7z
Extracting an archive
The following commands extract an archive.
$7z e [archive file name]
$7z x [archive file name]
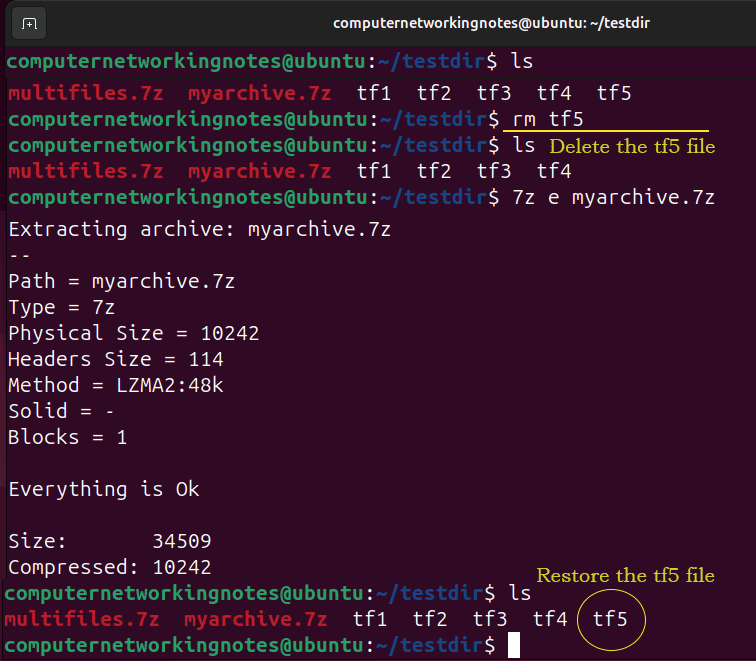
The option e extracts files in the current directory. It ignores their original file paths. The x option extracts files at their original destination.
Administrators mainly use archives for backup. A backup archive allows them to restore deleted or modified files. In the previous example, we created an archive of a single file. Delete that file and restore it from the archive.
Deleting individual files from the archive
The following command deletes an individual file or files from the archive.
$7z d [archive name] [file name1] [file name2] [file name3] [file name…]
The following command deletes the file tf4 from the archive multifiles.7z.
$7z d multifiles.7z tf4

Adding a new file to an existing archive
The following command adds a new file to an existing archive.
$7z u [archive name] [file name1] [file name2] [file name3] [file name…]
The following command adds the file tf1 to the multifiles.7z archive.
$7z u multifiles.7z tf1

Conclusion
7zip is a file archiver. It allows you to create and manage archives. In this tutorial, I explained how to install and use it on Ubuntu. I also explained common options you can use with it to manage archives through examples.
Author Laxmi Goswami Updated on 2026-05-07